In this blog, we are going to see how to generate output using RTF Templates in Fusion BI Publisher
I am going to show this using sample data. This is my sample data
I have saved my Data Model. Now I am going to prepare the RTF Template. Before that I need the XML tags which will be used in the RTF Template
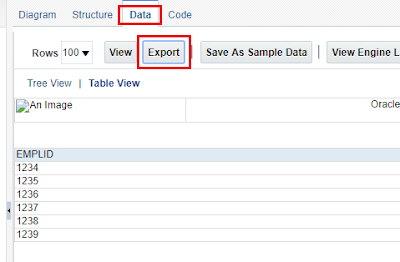
Click "Export" button in the "Data" tab as shown below.
The XML file will be downloaded based on your browser settings. This is my XML file
I opened a new MS Word Document as save it as "Rich Text Format" type
Now enable "Developer Options". Go to "Developer" tab , click "Legacy Forms" and select "Text Form". Once Template is Completed, disable "Developer Options"
In the XML, the tag "DATA_DS is appearing only once, and the tag "G_1" is repeating for each and every employee. So use the level "G_1" to generate the output for all employees.
To add the Start Level tag, double click the Text Form and Add Help Text as shown below and click "OK"
Similar way you can add new Text Forms using Developer Options or you can copy the existing Text Form and change the "Default Text" and "Help Text"
To add Employee Name tag to the output, follow as shown below
Following the same procedure, I have added Emplid tag to the output
To add Current Date tag to the output, follow as shown below
To add the End Level tag, follow as shown below
I have saved my Template. The text between Start Level tag and End Level tag repeats for each and every employee.
This is my RTF Template
Save the Data Model, Click "Save As Sample Data" button and Create a report based on the Data Model.
Upload the template as type "RTF Template" as shown below
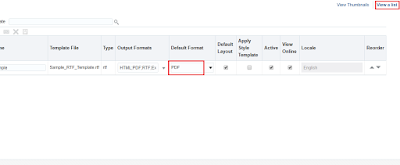
Click on "View a List" and select the "Default Format" based on your need. I have selected "Excel(*.xlsx)" as Default Format and saved the Report
This is my Output. The Text form tags which we added has been filled with the data from Data Model
I hope this blog explains how to generate Output using RTF Template. If you have any questions, please post it in the comments section.
I have saved my Data Model. Now I am going to prepare the RTF Template. Before that I need the XML tags which will be used in the RTF Template
Click "Export" button in the "Data" tab as shown below.
The XML file will be downloaded based on your browser settings. This is my XML file
I opened a new MS Word Document as save it as "Rich Text Format" type
Now enable "Developer Options". Go to "Developer" tab , click "Legacy Forms" and select "Text Form". Once Template is Completed, disable "Developer Options"
In the XML, the tag "DATA_DS is appearing only once, and the tag "G_1" is repeating for each and every employee. So use the level "G_1" to generate the output for all employees.
To add the Start Level tag, double click the Text Form and Add Help Text as shown below and click "OK"
Similar way you can add new Text Forms using Developer Options or you can copy the existing Text Form and change the "Default Text" and "Help Text"
To add Employee Name tag to the output, follow as shown below
Following the same procedure, I have added Emplid tag to the output
To add Current Date tag to the output, follow as shown below
To add the End Level tag, follow as shown below
I have saved my Template. The text between Start Level tag and End Level tag repeats for each and every employee.
Save the Data Model, Click "Save As Sample Data" button and Create a report based on the Data Model.
Upload the template as type "RTF Template" as shown below
Click on "View a List" and select the "Default Format" based on your need. I have selected "Excel(*.xlsx)" as Default Format and saved the Report
This is my Output. The Text form tags which we added has been filled with the data from Data Model
I hope this blog explains how to generate Output using RTF Template. If you have any questions, please post it in the comments section.


generate output using RTF Template blog was nice
ReplyDeleteThis comment has been removed by a blog administrator.
ReplyDeleteThis comment has been removed by a blog administrator.
ReplyDelete